Firstly, review your visual ideas based on from the previous exercise through a process of critical evaluation.
Which ideas are you drawn to?
Which ideas have ‘legs’ – possible interesting outcomes which are worth pursuing?
Often the ideas which are strongest are those which have depth, or many layers of association. Perhaps you are intuitively drawn to a particular idea. Select a few ideas you would like to push further.
Use your learning log to record your thoughts.
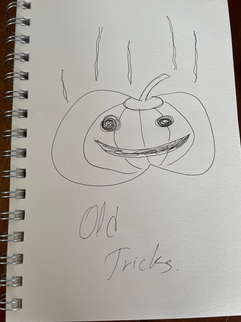
Looking at my initial sketches and my spider-gram, I think there are few ideas which are pretty 'flat' (as mentioned above, the more interesting ideas are the ones which are based on further associations). I think that the ideas which involve 'magic' are pretty appealing to me. As tricks are considered sometimes to have a negative connotation, but I look at tricks as something magical and mystical, especially if are related to the word 'old' and 'book'. As if there is an old book of forgotten magic and tricks. something more spiritual and ancient.
Here are 3 ideas I would like to explore further, and maybe also working on another only typography idea could be intereting.
Now, do you need to undertake any research to help move your selected ideas on?
The form your research will take depends on the individual elements of your idea.
Find source material that helps informs your ideas.
For example, by doing objective drawings or taking photographs, to understand your subject better, and to consider aspects of composition.
You can use both primary and secondary sources of research in this way.
Research feeds into the development of your visual work, informing and advancing your ideas. Document this phase of the work accordingly.
I have started to research about the phrase 'the oldest trick in the book' and saw this video about an Egyptian Magician who is perceived to be the 'owner' of the oldest trick (on BBC) in the book, also from my evaluation I have realised I was drawn to the mystical aspect of tricks, so I decided to go back to my spider-gram and brainstorm further.
I have came up with some really interesting ideas and decided to go on Pinterest so search some visual inspiration
insert brainstorm here
Few words that stood out to me in my brainstorm were: Tarot, Egyptian, Black Magic, Mudras.
There is a really beautiful store in town which is specialising in everything mystic so I decided to go and take some photos there.
Also my new planner for 2022 is an astrology based one and has a very beautiful mystic design.
Here are some visual images I took.
insert gallery here
The developing your ideas stage is about building on your initial ideas by reworking them, adding the visual or other insights gathered through your research, and testing out different versions or possibilities.
Spend 45 minutes developing the possibilities of one of your ideas.
How many different ways can you visualise this?
Visualising your ideas is the culmination of all your preliminary work in which you work up some more developed visual sketches and ideas. This artwork can be hand-drawn illustrations, photographs, and/or include typography. The presentation can be a little rough around the edges but should show the main elements of your designs. Select the strongest variation of your ideas from the previous research and development exercise to start exploring how you can visualise them within a mock-up.
Use your learning log to document these research and development stages, and to reflect on the process and your results.
Mockups are fun and I really like to make them, it is such a great indicator of how the final product / artwork can look like and it is crucial to explore it before finalising an idea as a 'test'.
I have learnt a lot about mockups on the previous unit which you can see on my blog in few places (here is one).
I took a picture of a book at my house, with a bit of the elements around it so it is easy to see how it will look 'in real life'.
I have imported it to photoshop to start create a mockup.
I started by placing s rectangle on top of where the cover is, and used free transform to make sure it is covering the edges (one edge is not 100% but as the task is asking the edges can be a bit rough this time so I wasn't too obsessed as I would normally be with perfecting it). I have places my own artwork on top, used an auto fix of photoshop for the lighting sake, and started experiment with some textures to make it look like a real book. When I have found my texture I have used the blending mode to create the mix of 2 layers, and also gave it a slightly yellowish background to make it look a bit old.
I have tired two options of the artworks I liked but looking on it in the mockup I only liked one of them (here is a good example of how mockup can help judge whether a design is good or not for the purpose).











Comments